This article was updated in April 2022 by the Good Housekeeping Institute Home Care & Cleaning Lab to include even more helpful cleaning tips.
Owning a Keurig means you no longer have to think about wrangling filters and ground coffee beans every morning. But many of us are guilty of not thinking about cleaning it often enough either — and that thing can get dirty. Like all coffee makers and single-serve coffee machines — as well as other home appliances like dishwashers, washing machines and ovens — Keurigs can serve as a breeding ground for harmful bacteria and mold if they are not regularly cleaned. Grossed out? Us too. Not only will regular cleanings extend the life of your appliance and protect your health, they’ll also keep your coffee tasting great every day.
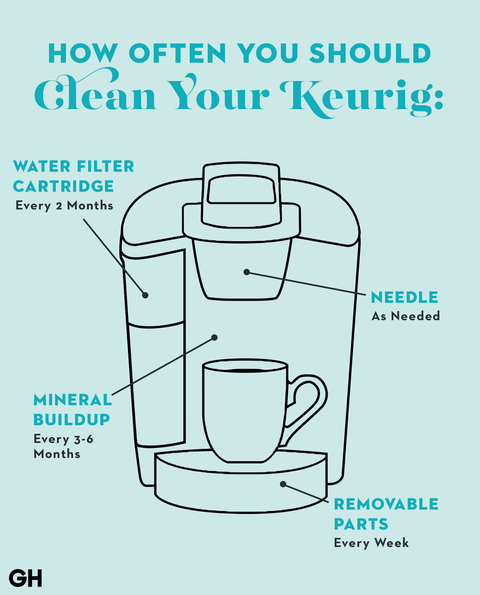
We asked Carolyn Forte, Executive Director of the Good Housekeeping Institute Home Care & Cleaning Lab, for advice on how to maintain your go-to morning machine. Start by buying the following cleaning cleaning essentials, then follow the timeline below for how often you should clean every part of your coffee maker.
How to clean a Keurig every week:
Ideally, you’ll want to wash the removable parts of your machine on a weekly basis, inside and out.
What you’ll need:
- Dish soap
- Cleaning cloth
- Sponge
Instructions:
- Unplug the machine.
- Disassemble the water tank, lid, mug tray and K-cup holder.
- Clean the mug tray and K-cup holder in warm, soapy water.
- For the water reservoir and lid, remove the water filter, then wipe the surfaces with a damp, soapy cloth.
- Rinse the reservoir and lid with water and let air dry (you don’t want to dry it with a cloth since this could leave lint behind).
- Wipe down the exterior surface with a wet sponge.
- Replace all the removable parts and plug the machine back in.
Flavor Tip: Use a Keurig rinse pod once a week or after brewing a flavored drink to keep your morning coffee from tasting like last night’s hot chocolate!
Replace your water filter every two months:
Every other month, you’ll want to replace the water filter cartridge to keep your coffee tasting fresh.
What you’ll need:
Instructions
- Start by soaking a new water filter cartridge in fresh water for five minutes, then rinse it for 60 seconds.
- Wash the mesh of the lower filter holder.
- Insert the cartridge into the upper filter holder, and snap on the lid.
- Finally, put it back into your reservoir and lock it into place.
This content is imported from {embed-name}. You may be able to find the same content in another format, or you may be able to find more information, at their web site.
Descale your Keurig every three to six months:
Hard water minerals can build up in your machine over time, which could affect how well it works. To prevent this, you’ll want to descale your Keurig at least twice a year.
What you’ll need:
Instructions
- Begin the descaling process by filling the reservoir with 16 ounces of white vinegar or Keurig Descaling Solution followed by 16 ounces of water.
- Start the largest brew size cycle without a K-cup and let the machine run as usual, using a mug to catch the liquid.
- Keep repeating this process until the ADD WATER indicator is illuminated.
- Let the brewer rest for 30 minutes.
- Empty and rinse the reservoir thoroughly. Fill it to the MAX line with fresh water and perform 12 rinsing brews using the largest brew size to remove any traces of vinegar or descaling solution.
- Brew coffee as usual.
Expert Tip: Simplify your Keurig coffee maker cleaning process further by scheduling your water filter cartridge replacement and descaling for the same day. Replacing the water filter cartridge immediately after de-scaling with vinegar will ensure that no vinegar taste remains for your next brew.
How to clean Keurig needles as needed:
When you see grounds in your K-cup holder, remove them with a sponge to prevent them from ending up in your beverage tomorrow morning. If you’re still having trouble brewing, there may also be coffee grounds stuck in the needles, which punch the entrance and exit points where the water flows through the K-cups.
Instructions
- Unplug the machine.
- Separate the pod holder from the funnel and carefully use a paperclip to clear away any clogging debris lodged in the exit needle.
- The entrance needle under the brewer head can also be cleaned with a paper clip, but has two holes that need to be cleaned.
- Rinse the pod holder and funnel before reassembling.
If you own a Keurig Plus or 2.0 model, you can use the brewer maintenance accessory instead.
As long as you follow these steps, you won’t have to worry about anything other than coffee being in your morning brew (well, unless you like yours with milk and sugar, that is!).
This content is created and maintained by a third party, and imported onto this page to help users provide their email addresses. You may be able to find more information about this and similar content at piano.io